

- Can I update stores using a CSV file?
- Generating CSV File with Update_ID Column for Store Updates
- How I can delete Stores via CSV file?
- Using a Custom Store ID Column in CSV Import
- How can I Add Categories Through Import?
- How I Can Add a Logo Using the Import Tool?
- What is the Store(s) Hours Format in the CSV Sheet?
- Why the "0 rows updated" Message?
- Import Action Events
Adding stores into your store locator can be done with the “Add New Store” page. However, if you have a long list of stores you can quickly import them using CSV Sheet Import. Furthermore, the plugin has a template that the admin can follow by adding all his/her stores’ details.
For more information on how to import or export stores’ data onto Agile Store Locator, please see the following article.
The columns for CSV sheet import are the following:
title, description, street, city, state, zip, country, lat, lng, phone, fax, email, website, is_disabled, logo_name, categories, marker_id, logo_image, description_2, open_hours, (any custom field)In addition, you can also include any custom fields that you have created, in the CSV sheet. This is done by adding custom columns to the CSV sheet.

| Field Name |
|---|
| title |
| description |
| street |
| city |
| state |
| postal_code |
| country |
| lat |
| lng |
| phone |
| fax |
| website |
| is_disabled |
| logo_name |
| categories |
| marker_id |
| logo_image |
| description_2 |
| open_hours |
It is absolutely critical to keep the header as the first row, and the header must be in the smaller case without any extra spacing.
If you have coordinates missing, the import tool will fetch them from the Google Geo-Encoding API. Furthermore, the mandatory columns are the city, state, and zip code columns to get accurate coordinates.
Please make sure the Google Server API key has been added and validated, by clicking over the “Validate API Key” button, before you proceed with the import.

Can I update stores using a CSV file? #
Yes, you can update the stores using a CSV file with the same import process, all you need is to make sure that the CSV file has a column named update_id that will contain the store id it will perform an update operation instead of the insertion, so to get that file to update the existing records, you need to export it with “Export with Store IDs” enabled, and then click on the Export button.

In case the update_id is not there, it will simply perform insertion and it may duplicate your stores if you will import it twice.

Generating CSV File with Update_ID Column for Store Updates #
To obtain a CSV file containing the necessary update_id column for store updates, follow these steps:
- Navigate to the export functionality within the Import/Export tab.
- Before exporting, locate and activate the “Export with Store IDs” switch. This action ensures that the exported CSV file will include the required
update_idcolumn. - Once the switch is enabled, proceed to click on the Export button.
- The exported CSV file will now contain the update_id column, which corresponds to the store ID. This column serves as a unique identifier for updating existing rows during subsequent imports.
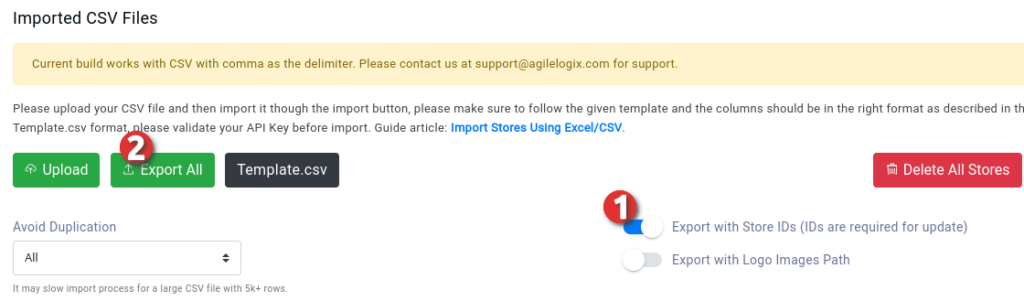
By adhering to these steps, you can generate a Stores CSV file with the update_id column, facilitating seamless updates to your store data within the Agile Store Locator plugin.
How I can delete Stores via CSV file? #
The stores can easily be deleted via CSV file as well by specifying a column named as delete_id, and mention the ID of the store in the row, the import process will look for that ID and will remove it, instead of performing update or insertion operation.
Using a Custom Store ID Column in CSV Import #
From version 5.2.4, Agile Store Locator supports both the default update_id format and an optional custom id column for updating or inserting stores.
Default Update Format #
By default, the CSV uses the update_id column to update an existing store by its internal Agile Store Locator store ID.

In this example, update_id = 1 means the importer will update the existing store with internal store ID 1.
Using Your Own Store ID Column #
You can also use your own id column in the CSV file.
Behavior
If store ID 1001 already exists, that store will be updated.
If store ID 1001 does not exist and ASL_INSERT_ON_UPDATE is enabled, the importer will insert a new store using ID 1001.
If the same ID already exists during insert, MySQL will reject it as a duplicate entry.
If no id is provided, MySQL will continue using the default auto-increment ID behavior.

Required PHP Setup
Add the following code to your theme’s functions.php file or a custom plugin:
if (!defined('ASL_INSERT_ON_UPDATE')) {
    define('ASL_INSERT_ON_UPDATE', true);
}

add_filter('asl_csv_update_field', function ($field, $update_key) {
    return ($update_key === 'id') ? 'id' : $field;
}, 10, 2);

add_filter('asl_csv_insert_store_id', function ($store_id, $row) {
    return !empty($row['id']) && is_numeric($row['id']) ? absint($row['id']) : null;
}, 10, 2);
This setup allows the CSV importer to use the id column as the store identifier. This is fully optional and does not affect existing CSV imports that use update_id.
How can I Add Categories Through Import? #
The import tool will automatically create categories and will assign them to stores. Moreover, you must add a pipe character “|” in-between multiple categories if you want to assign multiple categories to a single store.

Sub-Categories #
The sub-categories can be imported through the categories column via > sign separator, an example is given below.
Fruits>Apple|Fruits>BananaThe categories column will contain the data of categories as well as sub-categories.
How I Can Add a Logo Using the Import Tool? #
You can add your logo name and logo image to these columns: “logo_name” and “logo_image”. You have to upload the logo images which can be in these formats (jpg, png, jpeg, gif, jpg) through FTP service in the “Logo” folder under this directory location.
"/wp-content/uploads/agile-store-locator/Logo"The import method will only consider the logo_image field if the store logo_name doesn’t exist in the store locator logos. If you want to create a new logo make sure you have already uploaded a logo image into the following folder:
"/wp-content/uploads/agile-store-locator/Logo"In addition, the logo_name must be unique and shouldn’t exist in the existing Logo list.
What is the Store(s) Hours Format in the CSV Sheet? #
You can feed multiple slots of timing for each day, the format that you will feed in the open_hours columns will be as shown below:
mon=1|tue=0|wed=7:00 AM-9:00PM|thu=0|fri=7:00 AM-9:00PM,7:00 AM-9:00PMWhere you can see that days are separated by the ‘|’ sign, while multiple time slots are separated by the comma sign.
Why the “0 rows updated” Message? #
In case you are importing a CSV file and it reports that no rows are being imported, there are a few possible reasons behind it which are as follows.
1- Please make sure that the CSV file has the same format that is provided in the template of the Store Locator Import/Export page, if the headers are missing or in a capital case, it will not be considered.
2- Another key point is to make sure that the update_id column is empty as it will try to update rows instead of the insertion, and those stores might not be in the database to be updated.
3- Please check the delimiters of the CSV file, they must be comma-separated, you can verify them by uploading them into Google Spreadsheet.
Import Action Events #
Since version 4.8.32, we have provided two WordPress actions that are executed before and after the import file. These events are triggered using the following:
Before Import:
do_action( 'asl_before_stores_import' );You can use this action to perform any custom operations or modifications before the store’s CSV file is imported.
Example code can be added to the functions.php file of your theme.
add_action('asl_before_stores_import', function() {

  // Do Something
});
After Import:
do_action( 'asl_after_stores_import' );This action allows you to execute additional tasks or actions after the store’s CSV file has been successfully imported.
By utilizing these actions, you can extend the functionality of the import process and integrate any necessary customizations or additional operations as per your requirements.


